Introduction to build artifacts
Artifacts is a list of files and directories which are attached to a build after it completes successfully. This feature is enabled by default in all GitLab installations.
If you are searching for ways to use artifacts, jump to
Defining artifacts in .gitlab-ci.yml.
Since GitLab 8.2 and GitLab Runner 0.7.0, build artifacts that are created by
GitLab Runner are uploaded to GitLab and are downloadable as a single archive
(tar.gz) using the GitLab UI.
Starting from GitLab 8.4 and GitLab Runner 1.0, the artifacts archive format
changed to ZIP, and it is now possible to browse its contents, with the added
ability of downloading the files separately.
Note: The artifacts browser will be available only for new artifacts that are sent to GitLab using GitLab Runner version 1.0 and up. It will not be possible to browse old artifacts already uploaded to GitLab.
Disabling build artifacts
To disable artifacts site-wide, follow the steps below.
In Omnibus installations:
-
Edit
/etc/gitlab/gitlab.rband add the following line:gitlab_rails['artifacts_enabled'] = false Save the file and reconfigure GitLab for the changes to take effect.
In installations from source:
-
Edit
/home/git/gitlab/config/gitlab.ymland add or amend the following lines:artifacts: enabled: false Save the file and restart GitLab for the changes to take effect.
Defining artifacts in .gitlab-ci.yml
A simple example of using the artifacts definition in .gitlab-ci.yml would be
the following:
pdf:
  script: xelatex mycv.tex
  artifacts:
    paths:
    - mycv.pdf
A job named pdf calls the xelatex command in order to build a pdf file from
the latex source file mycv.tex. We then define the artifacts paths which in
turn are defined with the paths keyword. All paths to files and directories
are relative to the repository that was cloned during the build.
For more examples on artifacts, follow the separate artifacts yaml documentation.
Storing build artifacts
After a successful build, GitLab Runner uploads an archive containing the build artifacts to GitLab.
To change the location where the artifacts are stored, follow the steps below.
In Omnibus installations:
The artifacts are stored by default in
/var/opt/gitlab/gitlab-rails/shared/artifacts.
-
To change the storage path for example to
/mnt/storage/artifacts, edit/etc/gitlab/gitlab.rband add the following line:gitlab_rails['artifacts_path'] = "/mnt/storage/artifacts" Save the file and reconfigure GitLab for the changes to take effect.
In installations from source:
The artifacts are stored by default in
/home/git/gitlab/shared/artifacts.
-
To change the storage path for example to
/mnt/storage/artifacts, edit/home/git/gitlab/config/gitlab.ymland add or amend the following lines:artifacts: enabled: true path: /mnt/storage/artifacts Save the file and restart GitLab for the changes to take effect.
Browsing build artifacts
When GitLab receives an artifacts archive, an archive metadata file is also generated. This metadata file describes all the entries that are located in the artifacts archive itself. The metadata file is in a binary format, with additional GZIP compression.
GitLab does not extract the artifacts archive in order to save space, memory and disk I/O. It instead inspects the metadata file which contains all the relevant information. This is especially important when there is a lot of artifacts, or an archive is a very large file.
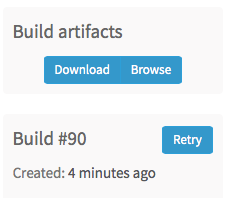
After a successful build, if you visit the build's specific page, you can see that there are two buttons.
One is for downloading the artifacts archive and the other for browsing its contents.
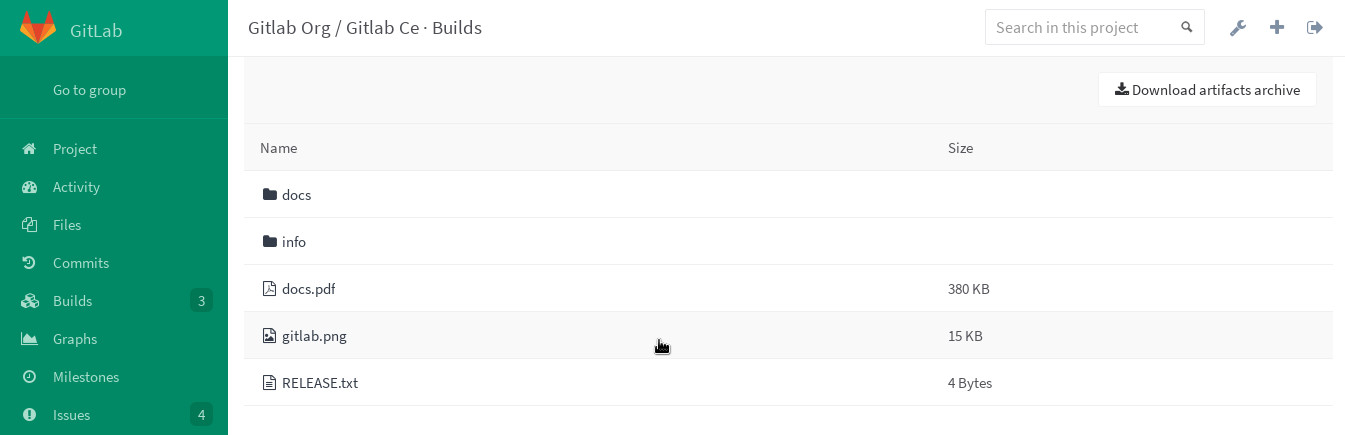
The archive browser shows the name and the actual file size of each file in the archive. If your artifacts contained directories, then you are also able to browse inside them.
Below you can see an image of three different file formats, as well as two directories.
Downloading build artifacts
If you need to download the whole archive, there are buttons in various places inside GitLab that make that possible.
While on the builds page, you can see the download icon for each build's artifacts archive in the right corner
While inside a specific build, you are presented with a download button along with the one that browses the archive
And finally, when browsing an archive you can see the download button at the top right corner
Note that GitLab does not extract the entire artifacts archive to send just a single file to the user.
When clicking on a specific file, GitLab Workhorse extracts it from the archive and the download begins.
This implementation saves space, memory and disk I/O.